Asus Strix Radeon R9 380 DirectCU II Review

Only a day after the official launch of the new AMD Radeon R9 300 series graphics cards, Asus Philippines already lent us a Strix Radeon R9 380 DirectCU II to take out for a spin.

Strix Radeon R9 380 Philippines

Introduction

The Strix Radeon R9 380 is Asus’ take on the R9 380 which is one of the latest graphics card from AMD. It was launched alongside the R9 390/390x, the new R7 300 Series graphics cards and the top of the line Radeon Fury lineup.

At the heart of the R9 380 is Tonga, the same 28nm-based GPU found inside the R9 285 which made its debut last year.

Specs

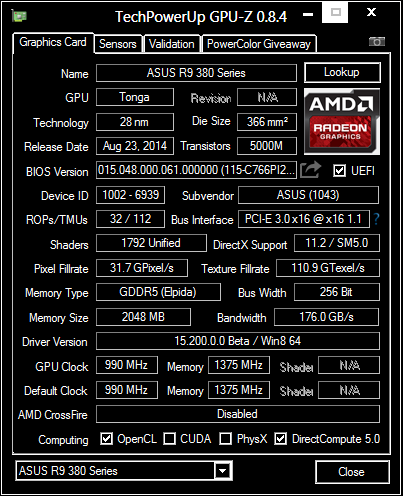
GPU isn’t the only thing that the R9 380 shares with the R9 285. It also has the same architecture, Stream processor count (1792) and same maximum TDP which is rated at 190W. So technically speaking, the R9 380 is more of a slightly revamped version of the R9 285 with higher engine clock speed instead of an entirely different beast.

For Asus’ part, the company has only made nominal tweaks on the GPU’s clock speed. From 970MHz of a reference R9 380, ASUS has bumped it up by 20MHz and has kept all the other settings untouched.

Design and Construction

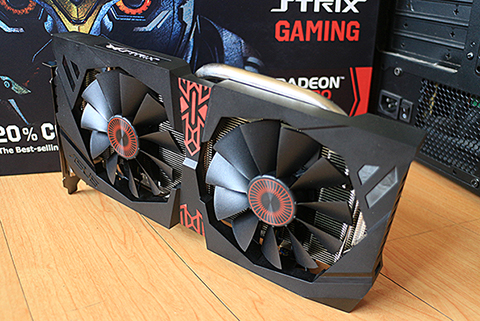
Like other graphics cards under the Strix lineup, the Strix Radeon R9 380 sports an owl-inspired plastic shroud that holds two 11-bladed PWM-controlled fans that aids in keeping the graphics card cool under load.

Strix Radeon R9 380 (web)

A total of three copper heat pipes (2x 8mm and 1x 10mm) pass through the card’s aluminum heatsink. One end of these heat pipes are flattened out and soldered together to form a copper base plate that directly touches the GPU.

The shroud, as well as the heatsink underneath it, overlaps the actual graphics card by a few centimeters, making the card a tad longer.

On the flip side is a fairly thick black back plate with a brushed metal finish. This provides better structural integrity to the card and also adds some style points.

Strix R9 380 (Web)

Only a small portion of the card’s black PCB can be seen peeking out of the back plate. A small cut out on the back plate shows an LED light located just below the 6-pin power port. The LED acts as an indicator if the power connector is properly hooked up (white) to the graphics card or not (red).

Rounding up the list of the Strix Radeon R9 380’s external components are the video out ports located at the back of the card. There are two DVI ports perched on the right, an HDMI out in the middle, and a DisplayPort on the left.

Test Bench and Software Used
AMD A10-7850K @ 4.0GHz
ASUS A88X Gamer Motherboard
8GB G.Skill Ripjaws X 2133Mhz dual-channel DDR3 RAM
256GB ADATA XPG SX900 Solid-State Drive
EVGA 500B 500W PSU
ASUS VX239H 1080p IPS Monitor

Windows 8 64-bit
AMD Catalyst 15.20-150505a-183821E-Asus
Fraps (frame rate measurement)
Open Hardware Monitor (Temp Monitoring)
Asus GPU Tweak II (Overclocking)

Synthetic Benchmark Tests

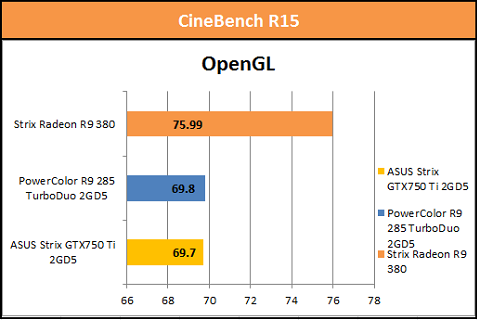
The results that we saw on the synthetic benchmark tests we’ve ran on Radeon R9 380 were pretty close to the ones we saw on the R9 285. It’s worth noting, however, that the R9 380 fared slightly better compared to the R9 285 on all of the test that we’ve ran.

3DMark 11(Performance and Extreme)

3DMark Fire Strike (Performance and Extreme)

CineBench R15

3DMark Vantage (Performance and Extreme)

Unigine Heaven 4.0

Gaming Performance (1080p)

Taking into account that the Radeon R9 380 has only seen nominal improvements from the R9 285, we were expecting that the frame rates that we’ll get from the R9 380 would roughly be in the same figure.

True enough, the R9 380 churned out near-identical frame rates to the ones we got from the R9 285 on almost all of the games we ran on our system.

Battlefield 4

Bioshock Infinite

Crysis 3

Tomb Raider 2013

The only two titles that saw dramatic improvements in frame rates are Far Cry 3 and GRID Autosport. On the latter, the average frame rates jumped by 10 fps giving us a smooth 60fps across the board.

It is on Far Cry 3 that we saw the most significant increase in frame rate. From barely reaching 30fps on the R9 285, the Strix Radeon R9 380 gave us a above 50fps on this game without breaking a sweat.

Far Cry 3

GRID Autosport

Temperature and Fan Noise

The Strix lineup takes pride in being a silent option for gamers and that holds true for the Strix Radeon R9 380. The graphics card’s fans are configured to only kick in when the temperature reaches a certain threshold (70 degrees Celsius) and will ramp up the RPM accordingly when the temps goes beyond that.

So in essence, users will barely hear anything from the graphics card on idle or medium load. But even when the fan started spinning, the noise that these fans generated was still well below the audible levels – a huge plus especially for nitpicky users with a silent rig.

Idle Temp
Snapshot taken 15 minutes after boot up.

During idle, the graphics card’s temperature hovered around 39°C to 44°C with the two fans not even moving an inch.

Gaming Temps
Snapshot taken 15 minutes in to game play.

When we fired up Tomb Raider, the temperature rose to about 65° C until it peaked to 76 degrees Celsius. It slowly decreased down to 69°C when the fans started to spin at a rate of 1100 – 1400 RPM.

FurMark Temps
Snapshot taken 10 minutes in to FurMark 1080p burn-in benchmark test.

When the Strix Radeon R9 380 got floored using the FurMark, the temperature rose to slightly above 80°C and stayed there during the whole course of the test. This was the only time we started to hear any sort of noise from the card’s two 11-bladed fans which was spinning at around 1900 – 2400RPM.

Here are the results that we got from the test.

FurMark (1080 and 720)

Overclocking

In addition to the modest factory overclock that Asus has applied on the Strix Radeon R9 380, we were able to push it a little bit by tweaking some of its settings.

OC Specs

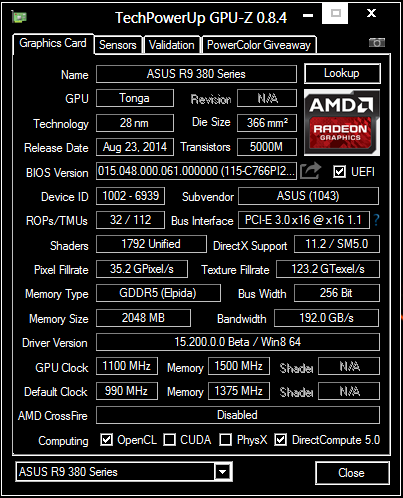
We ended up with an 11.1% increase in engine clock which translates in to 1100MHz. We were also able to bump up the memory clock speed from its stock frequency of 1375MHz to 1500MHz without any crashes or issues.

To test the stability and measure the performance gains from our overclock, we’ve ran the same set of benchmark tests and played the same games on it. Here are the results we got:

Synthetic Benchmarks

Games

With the exception of the CineBench R15 OpenGL test, we saw a small increase in results from the R9 380 after we overclocked it.

We also saw minor improvements on the frame rates from the titles we ran, particularly in Far Cry 3 and Tomb Raider.

Conclusion

The Radeon R9 380 is in awkward spot for a few reasons. For one, it doesn’t really offer a lot of improvements from the R9 285 which was just released nine months ago and might have already received a generous price cut with the release of the new R9 300 series graphics cards in the market.

This, in effect, narrows down the potential consumers, particularly existing HD 7000 series users who might have probably already went for the R9 285. Luckily, the R9 380 can bank on its cheaper market release price tag, currently pegged at $199, compared to the R9 285 which made its debut with a $250 sticker price.

Radeon R9 380 Strix (Web)

Now if you still opt to go for an R9 380, we think that the Strix Radeon R9 380 should be on top of your list. Sure, the factory overclock is modest at best, but its rigid design and commendable cooling solution should be enough to justify the $20 premium that Asus has put on top of the reference card’s SRP.

What we liked about it:

  • Great design and build quality
  • Rigid back plate for added durability and style points
  • Respectable cooling solution
  • Barely audible fan noise even at heavy load
  • Free 1-year subscription to X-Split
  • Handles overclocking fairly well
  • Reasonable premium on top of reference card’s SRP

What we didn’t like about it:

  • Not enough horsepower to drive demanding titles at 1440p
  • No bundled game/s
  • Doesn’t offer a lot for existing R9 200 users

The Asus Strix Radeon R9 380 DirectCU II will be sold locally for Php12,200.

The post Asus Strix Radeon R9 380 DirectCU II Review appeared first on YugaTech | Philippines, Tech News & Reviews.

AMD Debuts HBM-powered Radeon Fury Lineup at E3

Advanced Micro Devices (AMD) has formally introduced three new graphics card under the Radeon Fury lineup in this year’s Electronic Entertainment Expo (E3) which consists of two air-cooled R9 Fury and R9 Nano, and a water-cooled enthusiast graphics card the Radeon R9 Fury X.

Radeon Fury philippines

Leading the charge for the new Radeon Fury lineup is the R9 Fury X which, as mentioned earlier, is a water-cooled graphics card aimed at the enthusiast crowd. It comes with its own Cooler Master radiator block and a 120mm Nidec fan which AMD claims to have a better acoustic performance than that of the Titan X.

At the back of the R9 Fury X are three DisplayPort 1.2 ports and an HDMI out. This card can support up to six (6) displays simultaneously.

Next in line is the Radeon R9 Fury which, in a nutshell, is a slightly toned down version of the company’s flagship graphics card. Unlike the Fury X, this model doesn’t come with water cooling and instead rely on three (3) axial fans for cooling.

RadeonFury2

Lastly we have Radeon R9 Nano, a deceivingly small graphics card that only measures 6-inch in length, but packs quite a punch. With that size and low power requirement, this card should be ideal for small form factor PC and HTPC.

A single blower-type fan is responsible for cooling the graphics card and it shares the same video ports with its two bigger cousins which comprises of three DP1.2 ports and a single HDMI hub.

Despite the difference in form factor and cooling setup, these new Radeon Fury graphics cards actually share a lot in common with each other. Two of the most note-worthy similarities between these new cards include a new GPU dubbed as Fiji (comes in two variants Fiji XT and Fiji Pro), and 4GB of VRAM with High-bandwidth Memory (HBM) technology.

Radeon R9 Fury Specs

Of the three new graphics cards, the Radeon R9 Fury X will first hit shelves starting on June 24 bearing a USD649 sticker price. It will be followed by its air-cooled counterpart on July 14 which will be retailed for USD549.

Meanwhile, AMD is tight-lipped on the exact release date and pricing of the Radeon R9 Nano.

The post AMD Debuts HBM-powered Radeon Fury Lineup at E3 appeared first on YugaTech | Philippines, Tech News & Reviews.

AMD Offiicially Announces Carrizo APU

W Hotel Singapore – During the #FutureofCompute event, Joe Macri gave attendees a sneak-peek at the chipmaker’s latest Accelerated Processing Unit (APU) which is dubbed as Carrizo.

AMD Carrizo

Although Macri didn’t give the audience the entire details of the company’s new APU, his presentation gives us a quick overview of some of the things we can expect from it.

* Single, scalable infrastructure shared with Carrizo -L
* New Excavator core optimized for low power notebook/convertible form factors.
* Next-generation AMD Radeon Graphics Core Next with support for Mantle DirectX 12, and Dual Graphics.
* Single-chip integration of the APU and the Southbridge onto a single die.
* Significant performance and battery life improvements.
* First processor in the world with full HSA 1.0 support.
* AMD Secure Processor, leveraging ARM TrustZone technology for Enterprise-class security.

We’ll try to get more information about the AMD Carrizo, so do stay tune.

The post AMD Offiicially Announces Carrizo APU appeared first on YugaTech | Philippines, Tech News & Reviews.

ASUS ROG Crossblade Ranger Review

Lazada Philippines

AMD’s Accelerated Processing Unit (APU) has been around for quite some time already, but it’s only recently that ASUS released the Crossblade Ranger – the company’s first Republic of Gamers (RoG) motherboard that supports both A88X chipset and FM2+ socket. Head past the break to check out our full review of this gaming-centric MoBo.

ASUS Crossblade Ranger Philippines

Design and Construction

As soon as we took the Crossblade Ranger out of its packaging, we already saw some undeniable traces of its RoG lineage. Of course the ROG’s trademark Red and Black paintjob is already a giveaway, but apart from that, we saw some components that we don’t usually see on typical boards (more in this later).

ASUS Crossblade Ranger

In terms of the overall design, the Crossblade Ranger looks very similar to some of the Z97 boards under the ROG lineup, particularly the ROG Maximus VII. The FM2/FM2+ processor slot in the middle and is flanked by four (4) one-sided RAM slots on the right and a neatly designed Extreme DIGI+ III VRM on the left which comprises of eight (8) alloy chokes neighbored by 10K Black Metallic capacitors and NexFETTMMOSFETs tucked underneath the two heat sinks.

ROG Crossblade Ranger

The far end of the of the Crossblade Ranger’s left side houses the board’s I/O ports which comprises of four (4) USB 3.0 ports, two (2) USB 2.0 ports, an RJ-45, BIOS Reset button, TOSlink optical out, three video ports (VGA, DVI and HDMI), a PS/2 port and six (6) gold-plated 3.5mm jacks for the sound.

ROG Crossblade Ranger Philippines

Now over to the far right side we’ll see a red USB 3.0 header right beside the slot for 20+4 ATX power connector. Go upwards a little bit and you’ll be greeted with a pair of miniscule buttons for Reset and MemOK! These buttons, coupled with the fairly large “Start” button, LN2 Switch and POST display (Q-Code) should be a welcome addition to this board’s feature set, especially for overclocking enthusiasts.

ASUS ROG Crossblade Ranger

The bottom half of the Crossblade Ranger is not as busy compared to the other half. It’s mainly occupied by the board’s PCH (right) with eight (8) SATA ports beside it and a total of seven (7) PCI slots in the center which comprises of two (2) PCIe x1, a pair of PCIe 3.0 x 16 slots, one (1) PCIe 2.0 x16 and two (2) PCI.

ASUS ROG Crossblade Ranger Philippines

Placed around the edges of the of the bottom-half of the board are headers for (arranged in order from left-to-right) audio, TPM, ROG_EXT, Chassis Fan (CHA_FAN2), a pair of USB 2.0 and for your case’s front panel lights and buttons. In this area you’ll also find a trio of tiny buttons for Sonic Soundstage, KeyBot 2.0 and Clear CMOS.

Crossblade Ranger

Lastly we have the SupremeFX 2014 chip on the bottom-left corner of the board with a set of ELNA capacitors. There’s a yellow line that runs from this section all the way to the rear I/O panel which lights up (Red) when the board is powered.

BIOS and AI Suite III

Of course, having a well-designed motherboard is just half story. So ASUS made sure that the board is accompanied by an equally sick BIOS setup, as well as bundled software to complete the gaming/tweaking experience.

Considering that this board is designed for gamers and overclockers, we’re not totally surprised by the sheer number of tabs, menus and presets that the default BIOS has to offer under the “Advanced Mode”.

Crossblade Ranger BIOS

In here, one can pretty much alter/control all of the components that are attached to the board; from the fan speed, RAM timings and the frequency of the processor. All of these various presets are organized in such a way that even new ROG users should be able to find it without breaking a sweat.

Speaking of new ROG users, we’re also delighted to report that in addition to the Advanced Mode, ASUS has also added EZ Mode in the mix. Similar to Advanced Mode, users are also given an overview of their current system setup on EZ Mode, but instead of overwhelming them with a plethora of tabs and presets, the layout is less cluttered and more noob-friendly.

Crossblade Ranger EZ Mode

EZ Mode also allows user to configure their system to give it a slight boost, minus the complicated calculations and sound understanding of the components that the process usually entails/requires. Users can select from three pre-defined presets (set to “Normal” by default) on the upper right corner of the screen which is labeled EZ System Tuning.

In addition to the intuitively-designed BIOS, the Crossblade Ranger also comes with ASUS AI Suite III which also allows user to do some minor tweaks to some of the settings outside of BIOS. One easy way to do it is through the tool called 5-Way Optimization which tunes your peripherals to match the speed that you’re gunning for.

Crossblade Ranger AI Suite 3

Next up we have four (4) pre-defined settings on the top-right hand corner that users can select in order for the system to automatically adjust the settings which, theoretically, should suit the user’s current need.

Down at the middle section, we have additional menus that we can use to configure our settings. We have the TPU, Fan Xpert 3, Digi+ Power Control, Turbo App and EPU. Lastly, user are given an overview of their current system setup which includes CPU Frequency, Voltage, Temp, and Fan Speed down at the bottom portion of the AI Suite 3 window.

Other features

Before we reach the end of our review, we want to highlight some of the additional features that come with the Crossblade Ranger which you wouldn’t normally get on a non-ROG motherboard or competing boards in the same class.

ASUS LANGuard

This board inherits some of the features that are already present on some ROG boards, particularly those on a higher tier. One of which is the fancy Intel Gigabit Ethernet that’s equipped with ASUS LANGuard, which primarily protects the board from electric surge and improves the overall throughput, as well as GameFirst III which allows user to optimize how the data is being transferred to the PC and allocate more bandwidth if needed.

Crossblade Ranger SupremeFX

The two other nifty additions to the Crossblade Ranger’s arsenal are the Sonic Radar 2.0 and the latest iteration of the SupremeFX which are staple for ROG MoBos. These two add-ons, together with the additional components like the Japan-made ELNA caps, shielded EMI and a dedicated Soundstage button, are geared towards improving the overall sound output of the board for a complete gaming experience.

Rounding up the list of the Crossblade Ranger’s extra features are the KeyBot and RAMDisk. The former adds more functions to an otherwise plain USB keyboard by allowing users to assign Macros and shortcut keys to it.

ASUS KeyBot

RAMDisk, on the other hand, allows user to convert unused RAM into an extremely-fast temporary storage device.

Conclusion

It took ASUS quite some time to release an ROG motherboard for the FM2+ socket, but when they did, they made sure that they got all the bases covered and that all the waiting will not be laid to waste. That is exactly what the company did with the ROG Crossblade Ranger which, in our opinion, is currently the best FM2+ motherboard that money can buy.

It’s got all the bells and whistles that one would look for in a gaming board, not to mention additional features on the side for a truly immersive gaming ride. Not only is it functional, but it’s also an eye-candy which we’ve come to expect from an ROG mobo.

ASUS RoG Crossblade Ranger specs:
Form Factor: ATX (30.5 x 24.4cm)
Socket: FM2/FM2+, supports AMD A-Series APU
Chipset: AMD A88X
Support for RAID 0 / 1 / 5 / 10 and JBOD
DIGI+ III VRM
10K Black Metallic Capacitors
Alloy Chokes
NexFETTMMOSFET
Memory: 4x DIMM, up to 64GB DDR3 2400MHz (OC)
GPU: supports up to 3-way CrossfireX Technology
Storage: 8x SATA 6Gbps, RAID 0/1/5/10 support
Audio: SupremeFX Formula 2014 (RealTek ALC1150)
Expansion slots: 2x PCIe 3.0/2.0 x16, 1x PCIe 2.0 x16
I/O ports: 6x USB 3.0 (4 on the back & 2 mid-board)
8x USB 2.0 (2 on the back & 6 mid-board)
1x HDMI, 1x VGA and 1x DVI-D
5x Audio Jacks + 1x S/PDIF plus 1x TOSLink
1x PS/2 combo port
1x Intel® Gigabit Ethernet with GameFirst III and ASUS LANGuard

The only thing that may disappoint potential buyers is its price. The ASUS ROG Crossblade Ranger is being sold locally for Php8,990 which makes it the most expensive FM2+ motherboard currently in the market. But if you have extra cash to burn, we think that this board should be a good investment.

What we liked about it:

* ROG design and color scheme
* Use of premium material for caps, chokes and MOSFET
* Well-designed BIOS layout with support for mouse input
* SupremeFX and SonicRadar 2.0 for better audio output
* Simple yet intuitive AI SUITE III
* Comes with FREE ROG Mouse Pad!!!

What we didn’t like about it:

* 8 SATA ports are enough for most users but could’ve added more
* Additional USB ports on the rear I/O would’ve been nice
* Almost 30% more expensive than other high-end FM2+ MoBo

The post ASUS ROG Crossblade Ranger Review appeared first on YugaTech | Philippines, Tech News & Reviews.