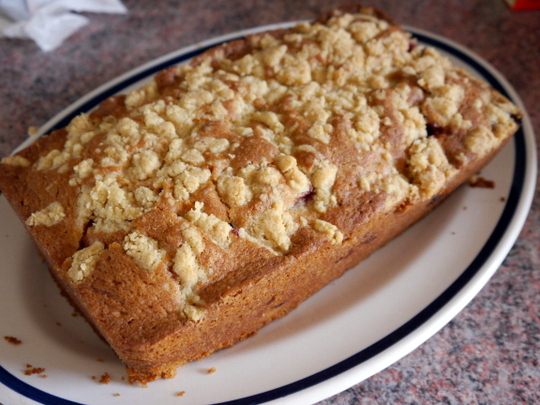
I saw this in the latest edition of the Good Housekeeping magazine and thought how seasonally appropriate it is. The cake came out quite nice especially if served with some custard. Although I thought the cake itself is quite crumbly so I adjusted the milk in the recipe to 1/4 cup. This is highly recommended for your afternoon tea and to use up your strawberries.
The picture is not particularly stellar because I honestly thought it would not taste good so I didn't expend much effort in getting a better image. How wrong I was!
Strawberry Streusel Loaf
175 g [scant 3/4 cup] unsalted butter - softened 175 g [scant 1/2 + 1/3 cup] caster sugar 2 large eggs 250 g [scant 2 cups] self-raising flour 1/4 cup milk grated zest of 1 lemon (optional) 200 g strawberries - hulled and quartered
I got this from bonus recipe card from the BBC FoodFood magazine years ago. We paired it with sweet English strawberries which are very much in season today. I only ever buy English strawberries and only when it is in season which is around late May to August.
This is a baked cheesecake compared to some of my other cheesecake here in this blog which required no baking. Maybe later I would try baking this in a waterbath.
Preheat oven to 180°C/fan 160°C/350°F. Grease and line the bottom of a 23 cm/9-inch springform pan.
Crush the digestives by putting it in a plastic bag and then bashing it with a mallet or rolling pin.
Mix the crushed biscuits with the rest of the base ingredients. Pour this in the prepared pan. Press the mixture with the back of a spoon to cover the bottom of the pan.
Bake in the oven for 5 minutes. Remove from oven and cool.
In a big bowl, combine all the filling ingredients with an electric mixer until well combined.
Pour mixture on top of the biscuit base in the pan.
Bake for 50 minutes until almost firm but with a slight wobble in the middle.
Remove from oven and cool completely in the pan.
To serve, remove the cheesecake from the cake pan.
[Optional] Dust the cheesecake with icing sugar. Break a few pieces of the chocolate flakes on top.
This is this year's birthday cake for myself. Very nice, moist and chocolatey. I especially like the cream cheese icing. I think I prefer it chilled straight from the fridge since the icing is on the soft side when at room temperature which caused a bit of problem when I brought it to work for my colleagues. The cling film covering it stuck on it so much that it didn't look too appetising.
This recipe is from my favourite epicurious.com food website
Sour Cream Chocolate Cake
195 g [1-1/2 cups] plain flour 3/4 cup cocoa powder 3/4 tsp bicarbonate of soda 1-1/2 tsp baking powder 1/2 tsp fine salt 1 cup sour cream 1/3 cup water 2 tsp vanilla extract 250 g [1 cup] unsalted butter - softened 270 g [1-1/3 cups] light brown sugar - firmly packed 3 large eggs
*For icing: 185 g [3/4 cup] unsalted butter - softened 250 g [1 cup] cream cheese - room temperature 115 g dark chocolate (70% cocoa) - melted and cooled 1 tsp vanilla 2 cups icing sugar - sifted
Preheat oven to 180°C/fan 160°C/350°F.
Grease and flour two 9-inch pans or 13 x 9-inch baking pan.
Sift all the dry ingredients into a bowl. Set aside.
Combine the sour cream, water, and vanilla in another bowl. Set aside.
In a large bowl, using an electric mixer, beat butter and brown sugar until fluffy.
Add eggs one at a time making sure to beat well after adding.
Add flour mixture in batches alternating with the sour cream mixture beating well until well blended.
Pour and spread the batter equally between the pans and smooth the top.
Bake for 25 - 30 minutes for the 9-inch pans (40 minutes for 13x9-inch) pan or until a skewer poked in the middle comes out clean.
Cool in pans for about 10 minutes. Turn out in rack and cool completely.
Cake layers can be made 1 week ahead and frozen, wrapped well in plastic wrap. Thaw layers before putting on the icing.
*For the icing:
Cream butter and cream cheese until light and fluffy.
Add remaining ingredients and beat until well combined.
*To assemble:
Lay first layer on the cake plate and spread some icing on it.
Top with the second layer and spread the rest of the icing on top and around the cake.
It's that time of the year again for my husband's birthday. Another excuse to experiment with one of the listed cake recipes in my to-bake list. I chose a caramel cake because I know my husband's fond of caramel. So Corinne's wonderful looking Filipino-style caramel cake recipe gets taken out.
It is essentially an airy chiffon cake with a pourable icing. The cake was good although I would have liked the caramel icing to be a little bit sweeter so I adjusted the recipe. And be very careful in caramelizing the sugar. I found out it burns very easily after it starts turning brown. Also, I didn't bother with cutting the cake in half horizontally and ice the middle. I thought there was not enough icing to spread around. This step is marked optional because our cake was just fine as it is.
4 large egg whites 1/4 tsp cream of tartar 1 cup plus 2 Tbsp sifted cake flour (or plain flour) 1 1/2 tsp baking powder 1/2 tsp salt 3/4 cup white sugar - divided 1/4 cup corn or vegetable oil 4 large egg yolks 1/3 cup water 1/2 tsp vanilla extract
Preheat oven to 180°C/fan 160°C/350°F.
Line the bottom of an ungreased 20cm/8-inch round 3-inch high pan.
In a large bowl, beat the egg whites and cream of tartar on high speed until frothy.
Add in half of the sugar (6 Tbsp) gradually while beating until stiff peaks form.
In another bowl, combine the cake flour, baking powder, salt and the rest of the white sugar. Mix well.
Add in the egg yolks, water and vanilla. Beat with electric mixer or by hand until smooth and well blended.
Pour batter into the prepared pan.
Bake for about 50 minutes or until top springs back when lightly touched or a skewer poked in the middle comes out clean.
Invert pan into wire rack immediately and cool completely. To release cake from pan, carefully run a thin knife around sides of pan and invert cake onto a large serving plate.
[Optional] Cut the cake in half horizontally. Invert the top half onto a cake plate and spread a little icing on it. Top it with the other cake half cut side down.
Pour the rest of the icing on the cake spreading evenly on top and the sides.
**Tip: For easier handling, wrap your cake very well in cling film, then refrigerate overnight before frosting.
*For the Caramel Icing:
2 egg yolks 1/2 cup white sugar - divided 1 1/2 cups evaporated milk (one 375 ml can) - divided 1 1/2 Tbsp cornstarch 1/4 cup boiling water 1/4 cup butter - cubed 1/2 tsp vanilla extract
Whisk the egg yolks with 2 Tbsp of the sugar in a small bowl/jug. Add in 1/4 cup of the evaporated milk and all of the cornstarch. Mix well and set aside.
In a heavy saucepan, over low to medium heat, carefully caramelize the remaining (1/4 cup) sugar.
When sugar is completely melted and a golden brown colour, add boiling water (careful it will splatter).
Bring back to a boil while stirring ocassionally making sure all the caramel well mixed into the water.
Gradually add in the rest of the evaporated milk (1 1/4 cups) while stirring. Heat mixture just until it starts to boil.
Without turning off the heat, pour a little of the caramel mixture into the egg yolk mixture while constantly stirring to temper the eggs. Mix until smooth.
Pour this back into the remaining caramel mixture in the saucepan. Mix until icing reaches a thick consistency.
Remove from the fire and then add in the butter and vanilla extract. Let cool just a little bit, whisking once in while. The mixture will thicken more as it cools.
Pour onto cake while still warm.
Note: This icing is pourable. Let it flow smoothly over the top and sides of the cake. Put strips of baking paper under your cake to catch the drips.
Mamon is a well-loved little sponge cake snack in the Philippines. For this recipe, the sponge is essentially a chiffon cake. I adapted the recipe from the wonderful baking blog Heart of Mary which is penned by a Filipina based in Australia.
She suggested there that greasing of the little cake tins is optional. Well you know me, anything to save labour is most welcome. But it did not work for me. The cakes stuck in the tins especially at the bottom. So that's one thing required in mine - grease the tins well.
The cakes came out really fluffy and they did not sink (which I was afraid it might do). They tasted wonderful, too, and not dry at all. I just had to reduce the salt because it came out a bit salty. So this recipe is well recommended.
Mamon
{A} 1 cup plus 2 Tbsp sifted cake/plain flour 1 1/2 tsp baking powder 1/4 tsp fine salt 6 Tbsp white sugar
{B} 1/4 cup vegetable oil or melted butter 4 large egg yolks - at room temperature 1/3 cup water 1/2 tsp flavouring (vanilla, butter, lemon, or orange extract)
{C} 4 eggwhites 1/4 tsp cream of tartar
{D} 6 Tbsp white sugar
Preheat oven to 180°C/fan 160°C/350°F.
Grease 10 small mamon tins. You can also use small brioche tins or small metal pudding moulds.
In a bowl, beat {C} on high speed until frothy. Gradually add in the sugar {D} and beat until stiff peaks are formed.
In another large bowl, combine {A}, mix well. Add in {B}. Beat with electric mixer or by hand until smooth and well blended.
Gradually and gently fold in egg whites into the egg yolk mixture.
Pour the cake batter equally into the 10 tins. Give the tins a gentle shake and a tap to remove air bubbles and to level off the batter. Arrange them on a large baking tray.
Bake for 25-30 minutes or until tops are golden brown and a skewer inserted into the centre of the cakes come out clean.
Immediately invert the tins onto a baking paper-lined wire rack. Tap the tins to release the cakes. Turn the cakes over and let ir cool off completely.
[Optional] While still warm, brush the tops with melted butter. This will allow the cakes to absorb some of the butter thus giving it more flavour. Finish off by sprinkling some granulated sugar on the tops.