I got this from bonus recipe card from the BBC FoodFood magazine years ago. We paired it with sweet English strawberries which are very much in season today. I only ever buy English strawberries and only when it is in season which is around late May to August.
This is a baked cheesecake compared to some of my other cheesecake here in this blog which required no baking. Maybe later I would try baking this in a waterbath.
Preheat oven to 180°C/fan 160°C/350°F. Grease and line the bottom of a 23 cm/9-inch springform pan.
Crush the digestives by putting it in a plastic bag and then bashing it with a mallet or rolling pin.
Mix the crushed biscuits with the rest of the base ingredients. Pour this in the prepared pan. Press the mixture with the back of a spoon to cover the bottom of the pan.
Bake in the oven for 5 minutes. Remove from oven and cool.
In a big bowl, combine all the filling ingredients with an electric mixer until well combined.
Pour mixture on top of the biscuit base in the pan.
Bake for 50 minutes until almost firm but with a slight wobble in the middle.
Remove from oven and cool completely in the pan.
To serve, remove the cheesecake from the cake pan.
[Optional] Dust the cheesecake with icing sugar. Break a few pieces of the chocolate flakes on top.
This is this year's birthday cake for myself. Very nice, moist and chocolatey. I especially like the cream cheese icing. I think I prefer it chilled straight from the fridge since the icing is on the soft side when at room temperature which caused a bit of problem when I brought it to work for my colleagues. The cling film covering it stuck on it so much that it didn't look too appetising.
This recipe is from my favourite epicurious.com food website
Sour Cream Chocolate Cake
195 g [1-1/2 cups] plain flour 3/4 cup cocoa powder 3/4 tsp bicarbonate of soda 1-1/2 tsp baking powder 1/2 tsp fine salt 1 cup sour cream 1/3 cup water 2 tsp vanilla extract 250 g [1 cup] unsalted butter - softened 270 g [1-1/3 cups] light brown sugar - firmly packed 3 large eggs
*For icing: 185 g [3/4 cup] unsalted butter - softened 250 g [1 cup] cream cheese - room temperature 115 g dark chocolate (70% cocoa) - melted and cooled 1 tsp vanilla 2 cups icing sugar - sifted
Preheat oven to 180°C/fan 160°C/350°F.
Grease and flour two 9-inch pans or 13 x 9-inch baking pan.
Sift all the dry ingredients into a bowl. Set aside.
Combine the sour cream, water, and vanilla in another bowl. Set aside.
In a large bowl, using an electric mixer, beat butter and brown sugar until fluffy.
Add eggs one at a time making sure to beat well after adding.
Add flour mixture in batches alternating with the sour cream mixture beating well until well blended.
Pour and spread the batter equally between the pans and smooth the top.
Bake for 25 - 30 minutes for the 9-inch pans (40 minutes for 13x9-inch) pan or until a skewer poked in the middle comes out clean.
Cool in pans for about 10 minutes. Turn out in rack and cool completely.
Cake layers can be made 1 week ahead and frozen, wrapped well in plastic wrap. Thaw layers before putting on the icing.
*For the icing:
Cream butter and cream cheese until light and fluffy.
Add remaining ingredients and beat until well combined.
*To assemble:
Lay first layer on the cake plate and spread some icing on it.
Top with the second layer and spread the rest of the icing on top and around the cake.
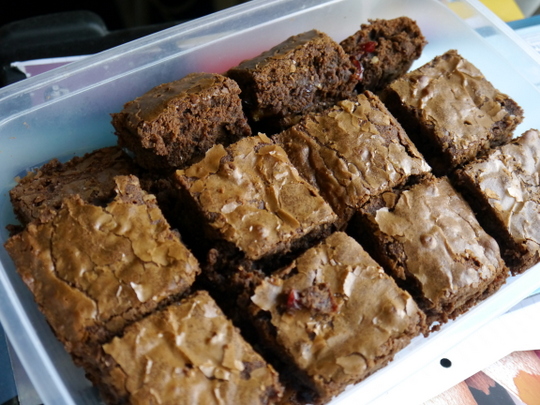
Tried jazzing up the brownies with fruit and nuts. So I got this recipe from the BBC Good Food magazine of years gone. I don't even know what month and year it came out. All I had is the torn out page with the recipe. It turned out quite nice being a quite different variation of the usual brownies. Although I noticed that it isn't as popular as the ubiquitous intensely chocolatey brownies. Nevertheless, quite a good change from the usual especially if you have some dried fruits and nuts to use up in your pantry.
Cranberry Pistachio Brownies
200 g [1/2 cup + 1/3 cup] butter 300 g dark chocolate (at least 50% cocoa content) 300 g [1-1/2 cups] light muscovado sugar 4 Tbsp milk or cranberry juice 4 medium eggs 200 g [1-1/2 cups] plain flour 1/2 tsp ground cinnamon 80 g dried cranberries 100 g [1 cup] pistachio - chopped icing sugar for dusting (optional)
Heat oven to 180. Grease a 9-inch/23 cm square baking tin.
In a saucepan, heat the butter, sugar, chocolate, and milk (or cranberry juice) gently while stirring constantly until the chocolate is melted and everything is well combined. Remove from heat and cool completely.
Whisk in the eggs one at a time.
Add the flour, cinnamon, and dried cranberries. Mix well.
Pour in half the batter to the prepared baking tin. Sprinkle the pistachio over and then pour the rest of the batter.
Bake in the oven for about 30-35 minutes or until a skewer poked in the middle comes out with no wet batter.
This is another hit from my trusted The New Best Recipe cookbook from Cook's Illustrated. I especially love the intense chocolate taste of this cookie while remaining quite soft and chewy. I do have to go grocery shopping for 50% cocoa content dark chocolates since my baking chocolates in my pantry is always 70%. The coffee in my opinion can be omitted since it really made the flavour very intense. But other than that they were very nice cookies indeed.
Double Chocolate Cookies (Thick & Chewy)
260 g [2 cups] plain flour 35 g [1/2 cup] cocoa 2 tsp baking powder 1/2 tsp fine salt 4 large eggs 450 g dark chocolate (50% cocoa content) - chopped 2 tsp vanilla extract 1 tsp instant coffee (optional) 185 g [3/4 cup] unsalted butter - softened 300 g [1 1/2 cups packed] light brown sugar 100 g [1/2 cup] granulated sugar
Mix flour, baking powder, salt and cocoa in a bowl and set aside.
Combine eggs and vanilla and beat lightly. If using, sprinkle the coffee over and beat until dissolved.
Melt chocolate in a heat-proof bowl over a simmering saucepan of water. Cool slightly and set aside.
Beat the butter with the sugars.
Add the egg mixture while beating.
Mix in the melted chocolate.
Add in the combined dry ingredients while mixing at low speed or with a wooden spoon.
[Optional] Cover bowl and chill in th fridge until scoopable (about 1 hour).
Pre-heat the oven to 180°C/fan 160°C/350°F.
Scoop or shape the dough into balls about 1 1/2-inch in diameter or about 55 g in weight and arrange in baking sheets 1 1/2-inches apart.
Bake in the oven for about 11-12 minutes or until the edges have begun to set but the middle is still soft.
Cool in the sheets for about 10 minutes and then transfer to racks and cool completely.
It's that time of the year again where baking and blogging for breads is compulsory for the World Bread Day. I don't mind it at all. In fact, I look forward to it come October knowing that I will add something in my list of breads that I've tried. As always every year this is hosted by the very generous Zorra of Kochtopf.
I have decided to bake something with chocolate to hit two birds with one stone. For it is also Chocolate Week here in UK. This recipe I adapted from a special insert in the current September issue of Waitrose's magazine. It is very good except that the filling was quite runny. So the instructions said to cut it in half lengthwise and then twist them together, I knew that it will be a messy affair if I did that. Hence, I just twisted them intact. I expected that it won't be too good looking when finally baked but I was rewarded with a nice swirl inside that was revealed when cut. And the taste of the bread itself was excellent. This is a definite keeper of a recipe. I just have to tweak that filling so it won't ooze out too much.
Chocolate Babka
*Dough: 7 g sachet easy bake yeast 250 g strong white bread flour 3 Tbsp dark brown sugar 1/2 tsp fine salt 1/4 cup whole milk 1 large egg - beaten 75 g unsalted butter - softened
*Filling: 1/4 cup whole milk 75 g milk chocolate - finely chopped 50 g dark chocolate - finely chopped 1 Tbsp cocoa 3 Tbsp caster sugar 1/2 tsp vanilla extract 1/2 tsp ground cinnamon
*Glaze: 3 Tbsp dark brown sugar 3 Tbsp water
*For the dough: **Manual method:
Gently warm the milk in a pan until it is just lukewarm, remove from heat. Stir in the yeast and set aside for about 5-10 minutes. By then, then yeast should be foaming (it is activated). If not, discard it and start again from the beginning with fresh milk and yeast.
Mix all the dry ingredients in a bowl. Make a well in the centre and add the milk-yeast mixture, egg, and butter.
Knead mixture in an electric mixer with a dough hook attachment for 6-8 minutes or mix and knead by hand for 10 minutes until smooth.
Cover with cling film, put in a warm place and leave to double in size (about 2 hours).
**Bread machine method:
Put all ingredients according to the manufacturer's instructions (usually with the yeast first) and put on the dough program. This will include its first rising.
*For the filling:
While dough is doing its first rise, heat the milk until steaming. Remove from heat and then add the chopped chocolates.
Stir until chocolates has completely melted.
Add in all the other ingredients. Stir to mix completely. Set aside to cool completely.
**Assembly:
Punch down dough and lay out on a floured surface. Roll out to a rectangular size about 12 x 18 inches (30 x 45 cm).
Spread the chocolate filling all over the dough. Roll up tightly like a log starting from the short end. Pinch the edges to seal it.
Trim the ends of the roll. Cut in half lengthwise with a floured knife.
Tightly twist the two strips over each other with the filling facing outwards.
Transfer to the prepared tin. Cover with cling film or tea towel and leave to rise in a warm place to double size (about 1 hour).
**For the glaze:
While the dough is doing its second rise, place the sugar and water in a saucepan and boil for about 2 minutes until syrupy. Set aside.
**Baking:
Preheat oven to 180°C/fan 160°C/350°F. Bake for 25-30 minutes until cooked through.
Brush half the syrup over the babka and leave for 15 minutes.
Brush again with the rest of the syrup then cool completely on a wire rack.