So you got yourself a decent camera with variable shooting modes, but what exactly do these letters mean and how each mode differ from one another. Head past the break and we’ll give you some pointers about Shooting Modes.
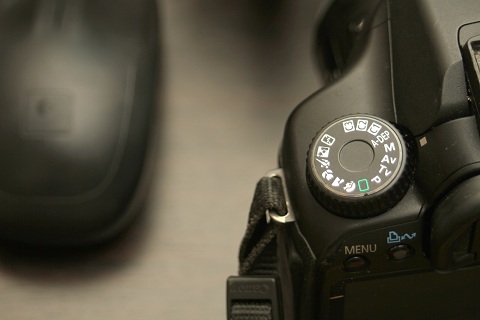
There are 5 common modes that are usually present on most camera; Automatic (Auto / Green Rectangle Icon), Program (P), Aperture Priority (A / AV), Shutter Priority (S / Tv) and Manual(M). However, depending on the camera that you’re using, you may have more or less shooting modes available at your disposal. We’ll take a closer look at each of them to have better understanding of these settings.
Manual (M) – As it name implies, this mode allows users to manually configure the camera’s settings to match their desired outcome. By enabling photographers to virtually change anything on the camera, it also give them to gain more control over the end result.
Since the camera is just taking order from the user, shooting in this mode can be quite tricky especially for those who are still learning the art. But this shouldn’t stop you from using Manual mode as it will give you a better grasp of how each aspect of your camera affects the final result.
When to use it: Shooting in an area where there is a constant light source (Sunny day with clouds or Studio). This is also a must if you’re gunning for a more creative shot.
When not to: Shooting in places where light source is variating every so often. Not advisable for those who have no idea on how each settings affect the picture.
Aperture Priority (A /Av) – In this mode users are allowed to set the ISO and Aperture of the camera and the snapper takes care of adjusting the shutter speed. This mode is a popular choice for pros as they often aim to take advantage of their pricey lens’ wide opening.
When to use it: Suitable when shooting stationary subjects as you’ll have more control on the depth of field of the shot. Also, A mode is a good choice when shooting in situations where lighting is often changing.
When not to use it: When shooting fast moving subjects. Moreover, some cameras selects a slower shutter speed in this mode, making it almost impossible to shoot without a tripod.
Shutter Priority (S / Tv) – This one is similar to the Av Mode, but instead of manually setting the Aperture, it’s the Shutter speed that the users set. As similar as these two shooting modes may sound, the adjustments that the camera makes in each mode is different from the other.

When to use it: This is ideal when you’re shooting moving subjects (Sports, Catwalk, moving cars,etc.) as you have control on how fast your camera snaps the photo.
When not to: You can still use this mode when shooting stationary subjects, but you’re better off setting the camera on A or M for more control over the other aspect of the shot.
Automatic (Auto / Green Rectangle Icon) – This is the complete opposite of the first shooting mode (M) as the camera takes care of every function. Having said this, users are just at the peril of the camera’s ability to gauge the shooting condition and has no control over the resulting image. Unfortunately, we notice most DSLR beginners (especially who makes their camera a fancy necklace) uses this setting when shooting.
When to use it: DON’T! Especially if you’re using a DSLR. You’re already heavily invested on your DSLR camera, might as well exert an effort to understand your camera’s settings by experimenting. Better yet, enroll yourself to a decent photography class just like Ken Go’s to speed up the learning process.
When not to: We think you get the idea.
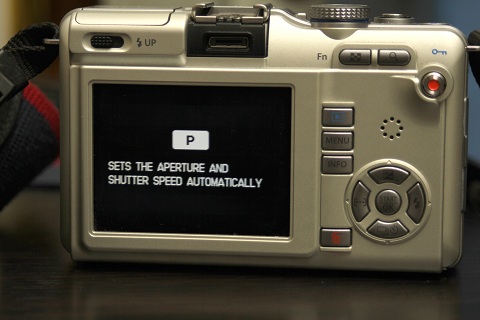
Program Mode (P) – Some photographers refer to this mode as Semi-Automatic in a sense that the camera automatically selects the aperture and shutter speed for you. It differs from the previous mode because you still have the luxury of altering some other settings like White Balance and Exposure Compensation to improve your shots.
When to use it: Use this a test shot to easily identify the condition you’re shooting in. After that, switch to Manual or Aperture Priority to gain more control over your pictures.
When not to: Often. As this mode sets aperture and shutter speed for you, users tend to be more dependent on the camera’s ability to gauge the situation. If you’re looking to hone your photography skills, stay away from this mode as well as Auto.
Conclusion
There’s an old saying that we think fits this topic “In achieving great photographs, it’s the photographer’s ability that matters rather than the equipment being used.” Digital Cameras are built to cope with the condition we’re shooting at, but more often that not, our cameras have a tendency to be a little off in some aspects and has little or no ability to know what end result we’re aiming for.
Having said this, we need to acknowledge the fact that we can’t fully rely on our camera’s ability to provide perfect shot every click. Therefore, understanding the three basic camera settings (Shutter Speed, Aperture and ISO) and how it correlates to each other would really go a long way. Assuming that you at least have a bird’s eye view of these settings, knowing what Shooting mode to use in a certain condition can aid you in nailing the perfect shot.
At the end of the day it all boils down to making the most of your camera, especially if that’s a DSLR camera. You don’t have to shoot in Manual mode to be a pro, but for crying out loud don’t limit yourself and your DSLR camera by setting it to Auto.
The post Understanding Shooting Modes appeared first on YugaTech | Philippines, Tech News & Reviews.